How to Properly Format Your Artwork for DTF Printing Using Photoshop
You can get Photoshop here.
Video Transcript
Hello and welcome to DTF Advantage! My name is Alyssa and today I’m going to show you how to properly format your file for DTF printing using Photoshop.
To get started, open Photoshop and open your design. Your design should be on a transparent background. If it’s not transparent, please remove the background.
Next, we are going to be making the file that we will upload to the DTF Advantage website. In order to do this, go to “file” then select “new.”
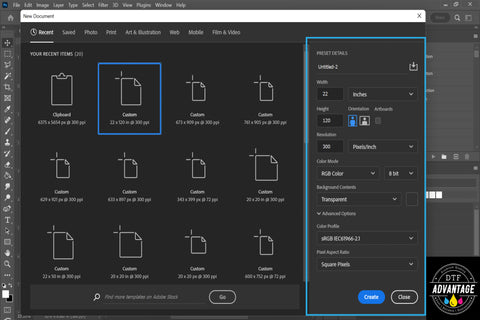
This is the most important part of the video. So, please make sure your settings match the ones I’ll be showing you.
First, make sure your orientation is vertical or in portrait mode. Make sure your units are in inches. Then set the “width” to 22 inches. Our printer’s maximum print width is 22 inches, so that is why we set our document width to 22 inches.
Next change the length to one of the lengths listed on our website that will fit your design size and the number of designs you need printed. When determining length, please note that you should leave a half an inch to an inch between designs so that you can easily cut between them.
Here is the list of our length selections. If you need help determining the length you need, please reach out to us! You can pause the video now to determine which length is the best for your project. Once you’ve figured out the proper length, enter it here. For today’s example, we’ll say our needed length is 120 inches.

Next, make sure your “resolution” is set to 300 pixels per inch also known as dots per inch. Anything under this resolution will produce a less clear print. Make sure your color mode is set to RGB and your “background contents” setting is set to transparent. We do not accept files that do not have transparent backgrounds.
Finally, make sure your “color profile” settings are changed to sRGB. If you don’t change this setting, your artwork may not print as vibrantly. Then hit “create.”
Now that we have successfully created our document, we can drag our design onto our transparent background by clicking on the artwork and holding the left side of the mouse down while dragging the artwork over to the new document tab. Then hover the cursor over the transparent background. Let go of the left side of your mouse and your artwork should appear like this.
Fill the document by copying and pasting your artwork until it fills the document completely. You can copy and paste your artwork by making sure your artwork is selected in layers and then hit “control + c” or “command + c” on mac on your keyboard and then hit “control + v” or “command + v” on mac to paste it. Again, please make sure to leave about an inch between designs in all directions.
I’ve already done this step, so please pause the video until you’ve successfully done this and I will show you how to properly save your document once you are finished.
Now that you have your document filled, we need to properly save it as a png file. You can’t upload any other file types to our website. To do that, go to “file” hit either “save as” or “save a copy.” I prefer to select “save a copy” so that is what I will do now. Click the "save as type" dropdown and select PNG.
Make sure your file will be saved in the proper area or folder you would like it to be saved in so that you can find it easily later. Then click "save."
And that’s it! Now it’s time to upload your properly prepared file to the DTF Advantage website.
Thanks for watching!
Summarized Steps:
- Open Photoshop and your Design
- Make sure your design has a transparent background
- Create a new document by selecting "file" then "new"
- If it's not on a transparent background, remove your background now.
- Create a new document by selecting "file" then "new"
- IMPORTANT: make sure your settings match as follows:
- Orientation: vertical/portrait
- Units: Inches (not pixels)
- Width: 22 Inches
- Length: your specified length that matches what is found on our website (please see the Length Chart)
- Resolution: 300 pixels per inch (also known as dots per inch)
- Color mode: RGB
- Background Contents: Transparent
- Color Profile: sRGB IEC61966-2.1
- Hit "Create"
- Drag your design onto your transparent background
- Copy and paste your artwork until it fills the page
- Hit "file" the "save a copy"
- Click the "save as type" dropdown and select "PNG"
- Click "save"
- Upload your file to dtfadvantage.com
- Celebrate your Accomplishment :)


